I've seen these ruched flowers on quilts, clothes, and bags, but I needed a headband for a new dress I bought my babe, so this came to mind.
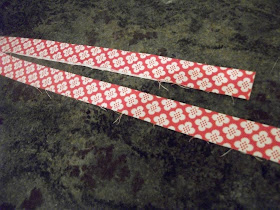
First, Cut a 2 x 40 inch piece of fabric (or 2 1/2 x 40 if you don't want the edges frayed)

Iron your fabric in half with wrong sides together (if you are making the non-frayed version you want to make it the same way you would make Bias tape)

I prefer the frayed version, it's a little more messy. You're strip should look something like this

take a needle and thread and start a basting stitch going diagonally downward from the top corner

then turn around at the bottom and stitch back up the fabric creating a "V" shape

when you reach the top of your fabric, slide your needle in between the fabrics so it come straight out the top

Then back down through the top

Every two or three V's pull your thread tight to create a ruching effect
When you have done this to your entire strip of fabric, tie off your thread and trim.

twist the fabric from one end in a circle made up of about 7 or 8 or your V's.
Use a new needle and thread to tac them together on the back to create the center of your flower

Twist the ruched fabric around the center and tac as you go.

Continue this until you have a finished flower
(if you're not sure what I mean by tac, just use your needle and thread to sew some of the petals together in a few places on your flower until you get the look you want)

You can hot glue a circle of thin batting or felt to the back of your finished flower to make it easier to attach to whatever it is your made it for

I also glued on a little bead to give the center a final touch. You cold also use buttons, or rhinestones, Whatever tickles your fancy.
Enjoy.

That is too cute, I will have to try that soon!
ReplyDeleteso cute!
ReplyDeleteAw this is really cute! I've never seen this before. Thanks for sharing! :)
ReplyDeletePS: I'm doing my first ever giveaway on my blog and I'd love if you'd come enter! Check it out: http://mygirlishwhims.blogspot.com/2011/02/my-first-giveaway-and-introducing-your.html
You master seamstresses amaze me. Now I can ruche because of you.
ReplyDeleteThanks so much for sharing this at Creative Juice Thursday...
Thanks for the great tutorial! I am going to make a few of these right now :)
ReplyDelete<3Becky
justbeckause.blogspot.com
Hi, I just wanted to tell you that I featured your Ruched Flower on my "Top Ten Fav Picks" at Boogieboard Cottage. Thank you so much for sharing this. Have a great weekend! Mary :O)
ReplyDeleteI was just saying how I NEED a gigantic flower headband for baby girl (even though she won't be here for 7ish more weeks). I'll have tons of leftover pink scraps from my quilt, so this is perfect use! Awesome.
ReplyDeleteThese are so pretty....I am inspired!
ReplyDelete