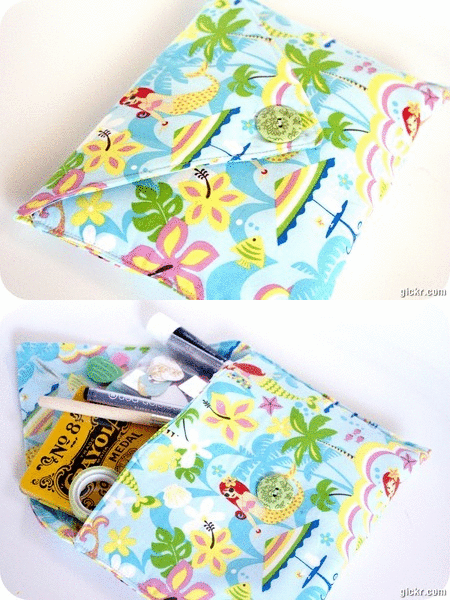
You may remember the art kit that Liz made Alfie. Well, that sort of sent me on a sewing spree (but what's new?).
I didn't have those cute little bags she used so I made this instead.
You will need:
Two 10" x 20" pieces of fabric (alike or different)
One 10" x 20" piece of fusible fleece
a Button and all your basic sewing essentials.
Use 1/4 in. Seams throughout
Start by ironing on the fusible fleece to the wrong side of one of your pieces of fabric.
(follow the directions that come with the fleece if you haven't used it before)
Lay your fabrics on top of each other with right sides together.
Mark 4 inches down on each long side
and 5 inches across (center) on one short end.
Use a ruler and cut from each side marking to the center marking, to create a point on one end of your fabrics.
Pin your layers together and sew all the way around them, leaving a 4 inch opening in the bottom (for turning).
trim the corners or cut off any "points" you see, being sure not to cut through your stitching
Now turn your bag through the small hole in the bottom, then press it, folding in the opening.
1. Top stitch around the entire bag catching the opening to sew it shut.
2. fold up the bottom of the bag so it sits 1/2" to 1" below the pivot that leads to the point (to make it look like an envelope) . Pin it in place on both sides.
3. Sew down each side right over the top of where you've already stitched.
4. Sew a button hole just below the point in the top of the bag
(if you've never done this, you can read about it in your sewing machine manual, it's so simple and usually really easy to understand-practice on a scrap fabric first if you need to)
Finally, Sew the button to the front of the bag.
Now, fill it full of goodies and make (or buy) a journal to give as an "Art Journal" set.
Definitely a one of a kind gift they will cherish for a very long time.


11 comments:
Shut up now! Loved the tute and especially died when I saw who it was for. She is going to freak!
How cute! Great tutorial...and easy enough too. Going to pin it!
Fabulous, I love it :)
So cute! Love that fabric! Thanks for the tutorial. I'm a new follower.
LeAnn aka pasqueflower
LOVE IT...I think I might even be able to make this! TFS! Pop Art Minis
SO cute! I'd love for you to link up at my party at http://scrapbookingez.blogspot.com/2011/09/everyone-wins-giveaway-linky-party.html if you get a chance! Thanks for sharing!
This is such a great gift idea! Thanks for sharing!
Oh and I forgot to say I am visiting from Gluesticks and I am a new follower! I hope you stop by my Delicately Constructed linky party and share this great project!!
Hope you have a great weekend!!
Michelle
www.delicateconstruction.blogspot.com
How cute and simple! This is great!
This is really cute...I'm gonna go through my stash and make one for my art loving daughter...Thanks.
Would love it if you would link this up to our Rockin' link party every Friday at RoCa and Company. Come and show off what you got this coming Friday. Hope to see you there...
Remember...YOU ROCK!!
Carmen @
RoCa and Company
www.rocaandcompany.blogspot.com
What a great little bag! Love the mermaid fabric!
Thanks for linking to a Round Tuit! Remember the voting is now open – if you want to head over and vote for your project! The most voted link will get a full post feature/promotion next week!
Hope you have a great week!
Jill @ Creating my way to Success
Round Tuit 67 voting
Post a Comment