Showing posts with label Sew Obsessed. Show all posts

Sunday, March 10, 2013

Playtime


Sundays are our best chance at some real downtime with the family. After church we hit up the local playground because it was a warm 45 degrees (yes, you read that right). With the winter we've had here, anything above 40 sounds pretty delightful. I wish we had more time to just be, to just sit and enjoy each other. Alfie and Juju are growing before my eyes and I'm constantly trying to take as many pictures as possible just to remember how beautiful and perfect they are right now. Every baby I see makes my heart flutter just a bit, thinking that I get to have another and enjoy them from the start again. 


So, We played at the park and I pushed Alfie on the swing "but not too high" and Juliette bossed me around and made me go down a tiny twisty slide so many times I felt sick, and I loved every single second. Then to top off a perfect day, we stopped to pick up a couple pallets to make a bed for Juju. A project I've had pinned for a year, but now that baby is coming I've finally got the motivation. I'm sure it has nothing to do with watching too many episodes of West End Salvage on HGTV while I'm up at night not able to sleep. Have you seen that show?

Either way, I'm glad I've finally got my to do list back into play. 


The fabrics used to make Juliette's Dress, Moda's Sophie line:

Monday, October 1, 2012

Dreaming of our little one.


Jennifer Fauset of Fauset Photography has put together an auction for her sister who has been trying for years to have a baby. She recently found out that IVF is her best option and to help a little with the enormous financial burden, Sew Obsessed has donated some items to auction away for a fraction of the retail price.   Here are pics of the goods. click over to their Facebook Page to start the bidding (bidding ends Oct. 8). 


Moda's Lilly and Will Bundle and Cupcake pincushion 


Lot of: Mini Iron, straight pins, fabric circle cutter, fabric markers, measuring tape and Heather Bailey's smarty girl book bag pattern.


I also donated a couple paper party crowns. Use them for a Bridal or Baby shower, or save it and use  year after year for Birthday dinners. (One size fits Baby  - Adult)   Ahh yes, and what's more... The shipping is FREE!  


There are tons of vendors involved, so check it out. It's  Great way to score some good deals and, of course,  help someone fulfill their dream of becoming a Mother.


Monday, August 13, 2012

Shirring Tutorial


 Q. What is Shirring? 
 A. a sewing technique that uses elastic thread to create rows of gathers in fabric.

How to do it:

1. Wind bobbin by hand with elastic thread. Keep the elastic taught as you wind.  Load your bobbin into your machine and thread the top with regular thread. Set stitch length to highest possible setting (longest stitch) and set tension to highest setting as well. While you sew the fabric will shirr because of the contracting elastic. 

*Don't stress out if the thread doesn't contract immediately. once you've finished, just hit the threads with some steam from your iron without actually touching them and they'll gather right up*

2. Stop at the edge, within the seam allowance, of your first row of stitching. Keeping the needle in the down position, lift the presser foot, and turn your fabric 90 degress toward the next row shirring. Lower the presser foot and sew a few stitches. Once you reach the beginning point for your next row, leave the needle down, and lift your presser foot once more. Rotate the fabric to the starting point of your next row and put the presser foot down. Sew. You'll probably have to stretch the fabric flat with each new row, because it's likely to shrink up with the first. 

Your rows should look something like this


3. Once you've finished all your rows, Secure your shirring by replacing the bobbin with regular thread  (return the length and tension setting back to normal),  and stitching a line over the shirring perpendicular with in the seam allowance. 


Now go try it! 


Patterns that call for shirring

Friday, March 16, 2012

Summer Sewing Camp for Girls


I'm thrilled to announce my latest endeavor.. summer sewing classes for girl's ages 10-14. Visit my website summersewingcamp.com for more details.

Monday, March 12, 2012

Freezer Paper Patterns


If you've got your hands on a pattern that you think you'll use in more than one size, or you'd just like to keep intact...here's a trick that'll have you whistling while you work:

Buy Freezer Paper from the grocery store. Trace your pattern pieces onto it in the size you'd like to make.


Cut pieces out and iron them onto your fabric for just a few seconds until they stick


Cut the fabric around the pattern using a rotary cutter or scissors,


then peel it off to use again 3 to 4 times.


Wednesday, December 14, 2011

Attention Utah Locals


If you live in Utah and you love fabric (or know someone who does) , you should really stop by my Mother's house for this awesome one day fabric boutique put on by Sew Obsessed. I've loved getting to know so many of you through my blog, It'd be fun to meet you in real life :) 
Hope I see you there. 

Thursday, November 10, 2011

Local

Since we moved Sew Obsessed online, We've missed having a little store to decorate, so we opened a small booth at the Quilted Bear in Provo, UT. It's got loads of fat quarter and half yard bundles as well darling patterns and gifts. If you are a Utah local, you should come check it out.

Baby not for sale :)


I've also got some of my personal creations in local shop Dear Lizzie, in Alpine, UT.
I've thought of opening an Etsy shop, but in an effort to be less busy I haven't done it. 
So again, if you live in the area, stop by (especially if you've never been there before, you may just spend your life savings).

Here's what they're carrying


Camera Strap Covers (Yep, same as the one in my tutorial)


Ribbon work Rosette Headbands ( Sorry, No tutorial for this one. I've been hoarding this technique like it's my Grandma's secret recipe.)


Paper Party Crowns, I just LOVE making these 

If you'd like to custom order any of the above items you can email me here.

Monday, October 31, 2011

No Tricks, Just Treats


Happy Halloween! 
Today only receive 10% off Sew Obsessed's already reduced prices with coupon code: SPOOKY
Take advantage and get started on your christmas gifts!

I can't believe I've never taken my kids Trick or Treating in my neighborhood.  We've always had other plans or have been out of town.  I guess this years the first! 
What are your Halloween Plans?

Wednesday, October 5, 2011

Sew Obsessed Giveaway (CLOSED)

We are still working hard on our new and improved online shop Sew Obsessed, but in the meantime we've dropped every single fabric price permanently.  You won't pay more than 9.00 a yard for any designer fabrics, which includes Amy Butler, Heather Bailey and many many more.  

What's even better than affordable fabric?  

FREE FABRIC!

Win these 6 Lily Ashburn fat quarters by Moda


Here's How:
( Each is a separate entry, so please leave a separate comment for each.)

1. Follow This Blog
2. Visit Sew Obsessed and tell me your favorite item
3. Follow Sew Obsessed on Facebook
4. Follow Sew Obsessed on Twitter

Good Luck!

Giveaway ends 10/8/2011 @ 11:59pm

Friday, September 23, 2011

Pattern Review: Rosie Posie Pants by Pink Fig Patterns


My finished Pant:


You may not be into the super frilly, girly, ruffley stuff, but If you are (and I am) then you will love this pant, or any Pink Fig Pattern in that case.  These pants were SUPER simple. If you've made pajama pants before and know how to sew a basting stitch to create a ruffle, (and even if you haven't!) these pants are a cinch. The instructions are very clear and easy to follow.   These pants are a little more time consuming than other's I've made due to all the ruffles, but definitely not hard.  
The pattern calls for a rolled hem stitch on a serger, but I just used a 3 thread overlock stitch. Don't panic if you have no idea what I just said, she gives instructions to make the entire pant with a good old fashion sewing machine :) I would recommend this pattern to anyone and even/especially a beginner.

I used This and This Fabric from Anna Maria Horner. 

Pin It

Tuesday, September 20, 2011

Stay-put Hair Bow


Every hair bow I make, that's not a headband, seems to fall our of Juliette's hair, So I was thrilled when I saw my sister-in-law making these. I pulled out the old scrap box when I got home.

The main trick to keeping them in, is to use a contour clip instead of an alligator clip, but if the bow is too heavy it will still fall out. These are just the right size and weight for an everyday hair bow.   


Cut two 2" x 4" rectangles with your fabric folded (cut them at the same time with wrong sides together).
Now leave them just as they are and sew 1/4" in from the edge around the entire rectangle, pivoting at each corner.


pull the little strings on the edges of your fabric to fray it


Using heavy (or upholstery) thread, sew a running stitch down the center of your rectangle, then pull it tight to gather the middle, and wrap the thread around the center a few times and tie it off. 
Now, cut a 2" x 2 1/2" square of the same fabric and press each long side into the center.
Hot glue it around the center of your bow to hide the thread (don't burn yourself), then cut off any excess. Be sure you start and stop your center piece on the back of the bow so you won't see any glue.


Glue it to a contour clip while the clip is open, so you don't accidentally glue it shut.
Wait for it to dry and you're done!

Tuesday, September 13, 2011

Traveling Art Kit

myspace graphic at Gickr


You may remember the art kit that Liz made Alfie.  Well, that sort of sent me on a sewing spree (but what's new?). 
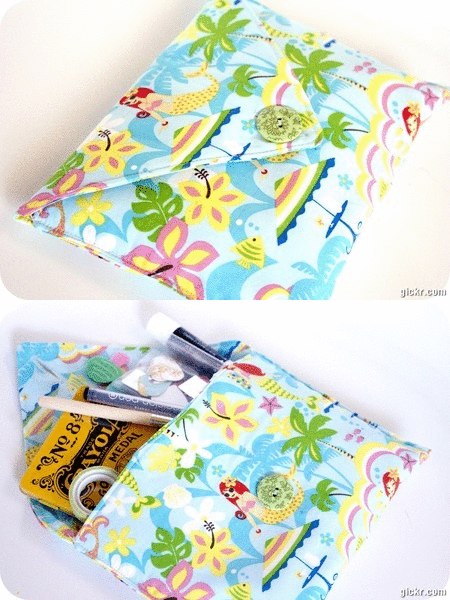
I didn't have those cute little bags she used so I made this instead.
You will need:

 Two 10" x 20" pieces of fabric (alike or different)
One 10" x 20" piece of fusible fleece
a Button and all your basic sewing essentials.

Use 1/4 in. Seams throughout

Start by ironing on the fusible fleece to the wrong side of one of your pieces of fabric.
(follow the directions that come with the fleece if you haven't used it before)

Lay your fabrics on top of each other with right sides together.
Mark 4 inches down on each long side
and 5 inches across (center) on one short end.
Use a ruler and cut from each side marking to the center marking, to create a point on one end of your fabrics.


Pin your layers together and sew all the way around them, leaving a 4 inch opening in the bottom (for turning).


trim the corners or cut off any "points" you see, being sure not to cut through your stitching


Now turn your bag through the small hole in the bottom, then press it,  folding in the opening.
1. Top stitch around the entire bag catching the opening to sew it shut.
2. fold up the bottom of the bag so it sits 1/2" to 1" below the pivot that leads to the point (to make it look like an envelope) . Pin it in place on both sides.
3. Sew down each side right over the top of where you've already stitched.
4. Sew a button hole just below the point in the top of the bag
(if you've never done this, you can read about it in your sewing machine manual, it's so simple and usually really easy to understand-practice on a scrap fabric first if you need to)

 Finally, Sew the button to the front of the bag.
Now, fill it full of goodies and make (or buy) a journal to give as an "Art Journal" set.
Definitely a one of a kind gift they will cherish for a very long time.


Mermaid fabric coming soon to Sew Obsessed

Pin It

Monday, September 12, 2011

Date Night: Rascal Flatts Concert


Steve and I have been in need of a real date night (as in, not the movies). Steve picked us up some concert tickets to see Sara Evans and Rascal Flatts. Both were awesome.  I'm not a die-hard country music fan, but I will say this: Country music concerts are probably the funnest concerts to see.
The year Steve and I met,  Rascal Flatts had just come out with their first popular album, and we loved it and listened to it constantly, so it's kind of like a little sound track to our dating life.  We've seen them several times and they never fail to impress.

To make the night complete We ate at our favorite greasy mexican restaurant


and had dessert as Sweet Tooth Fairy, this place is the reason that I could never get off sugar . yum.....


and I wore my new bag made by Tanya. You may remember this bag, I made from the same pattern, but if you know me well, then you know I wear things out VERY quickly. When I saw that Tanya was closing her Etsy shop, I jumped online asap and purchased this.  She is definitely one of my idols when it comes to sewing skills.


Check out her machine quilting and her ribbon work flowers.


She used this fabric and her pattern, which she custom made for Sew Obsessed.

 by the way, Sew Obsessed is having a HUGE sale this week only, 30% off your entire purchase with the coupon code:
SEPTEMBER


Linking to Pleated Poppy and here